


You want to learn how to set up a membership inside of ThriveCart to get the recurring revenue, right?
Here’s what I’ve found to be the most effective way to set up a membership inside of ThriveCart. This method is the simplest way long term to keep reporting + maintenance simple. I’m HUGE on minimalism when it comes to tech (and everything, tbh), and that does not change with how I organize my tech.
So let’s get started.
Step One: Create a Course Portal in ThriveCart’s ‘Learn’
If you’re organizing your membership to have one portal that you want people to work out of, you can just create a course in a ‘project’ labeled ‘MEMBERSHIPS’. If you want to have multiple tiers to your membership with each tier having access to different resources, you’ll need to create 2 different course portals.
When creating the course portals, I STRONGLY recommend making one portal first, filling that up with as much content as possible that both tiers will have, and then duplicating that portal. It will save you hours and hours (trust me).
When selecting the course layout, I strongly recommend the ‘Grid (page)’ view simply because it looks more like a portal vs an online course.
Step Two: Create the Modules for Your Membership
Now before you dive into mapping out the modules inside of ThriveCart, I recommend getting clear on the order + contents first in a Google Sheet. It’s just easier to edit, and you have an easier time seeing whats inside of where.
Assuming you do the Grid view for the home page of your portal, you’re going to need a couple of graphics:
- Module Cover Graphics (1280px x 960px)
- Lesson Graphics (1080px x 1080px)
Module graphics can simply be branded words that explain the contents of the module. For the lesson graphics, I like to use emojis to indicate what’s inside of the lesson. But you can get creative and do whatever you want there!
💡 Want to reduce customer support emails? Have a Customer Service module. I recommend including your Terms + Conditions, a module for how to reach out to you in case they’re in need of support, and an update billing + contact info module.
Step Three: Add Membership Content to the Module
Stated early but worth repeating … it is easiest to duplicate content inside of a ThriveCart, rather than start with a lesson from scratch. ThriveCart is getting better about creating default setting, but in the meantime here’s what I recommend as best practice.
Create a ‘master lesson’ that contains the following elements in your branding:
- a text box
- a button
- a ‘download’ element
- an FAQ element if you plan on using this
- a divider
Whenever you want to create a new lesson, it will be much faster for you to duplicate the master lesson and delete the elements you don’t need, rather than having to re-input the settings for each element.
Also!
If you ever want to create a clickable image in your course portal, you’ll need to use the ‘button’ element and select ‘custom image’. There’s no way (at the time of writing this) to add a link to the ‘image’ element.
Step Four: Finalize Your Course Portal in the ‘Course Options’ Section
Here, you can fill in a few more things to amplify your customers experience. There’s a couple things I recommend doing at this stage:
- Select the ‘promote this course in the student dashboard’ section and link to your membership’s sales page
- Customize the login page to be specific to your membership
Those are the only things I would deem as ‘essential’ but you’re capable of deciding whether or not that’s right for your business/your client’s business.
Step Five: Create the ‘Product’ for the Membership
In ThriveCart, you can create multiple versions of your checkout cart, each known as a ‘product.’
So in the example of a membership, let’s say you have different pricing tiers for it.
For easy math – let’s say you had a $50/mo price at tier 1, $100/mo at tier 2, and a lifetime price at $800 (paid all at once).
Instead of making different ‘products’ (checkout carts) in Thrivecart for each of these price points, I recommend having multiple payment options in the same ‘product’/checkout cart to minimize your maintenance long term.
Because here’s the thing – you want to keep as few products as possible in ThriveCart. This goes for all of your products, not just memberships. It makes maintenance and reporting SO much smoother later on.
The steps to create the product are pretty straight forward. Just fill in the information after you select ‘create product’ with what you’d like it to be.
A few things to point out:
- Pricing will be a ‘subscription’ payment plan at whichever frequency you see fit. I would make sure to select the option ‘send on recurring payment’ so the buyer will receive an invoice for every single payment they make, not just the first one.
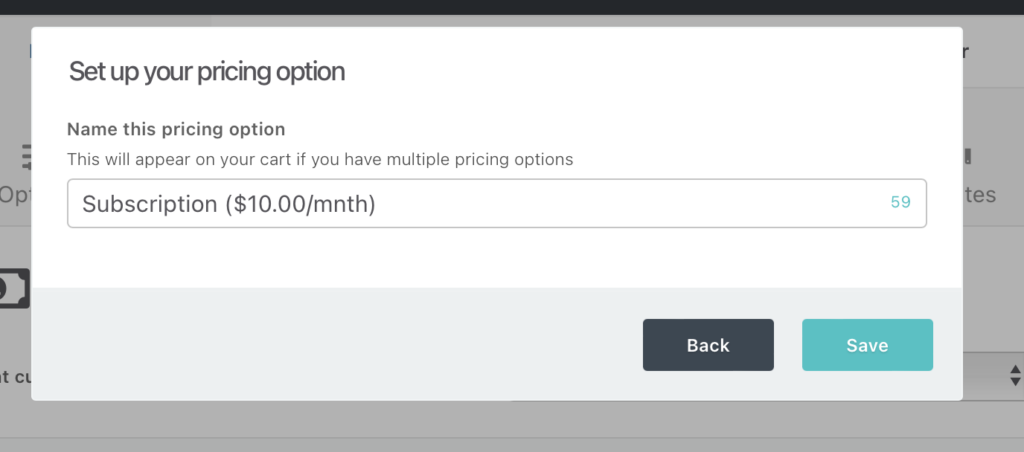
- If you ever modify the first page of the pricing, you will need to modify the copy on the ‘Name of the pricing option’ field as well (depending on how you have it labeled)
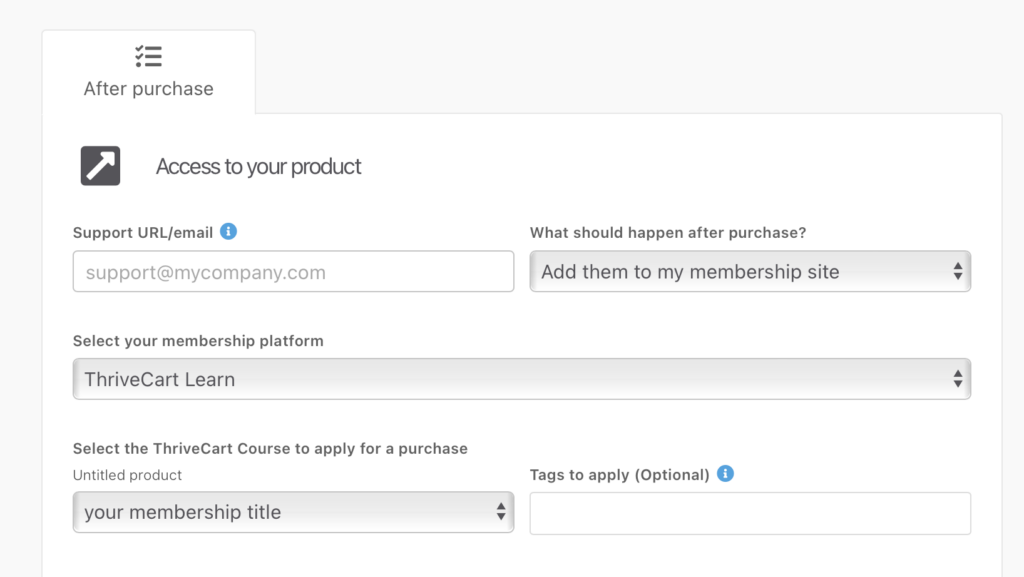
- For fulfillment, select ‘Add them to my membership site’ >> ‘ThriveCart Learn’ >> and select the portal for your membership
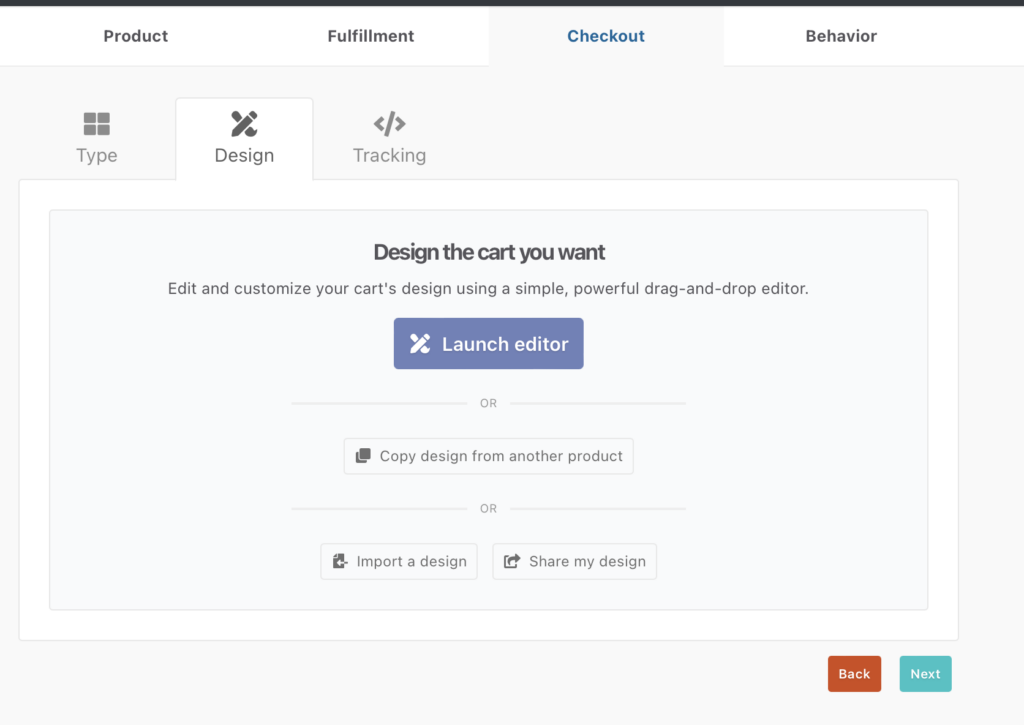
- You can copy a checkout page from another product if you already have a checkout page design you want to start off from. (see button underneath the ‘Launch editor’?)
At this point, I would ‘save’ the product and come back to it after completing Step Six.
Step Six: Set up Customer Behavior Tags in your Email Marketing Platform
Open up your email marketing platform. Full discretion – I use ConvertKit and have yet to use any other options for this process. It may look slightly different if you use a different platform for your email marketing.
Create the following tags for your membership:
- [NAME OF MEMBERSHIP] _ Active Member
- [NAME OF MEMBERSHIP] _ Cancelled
- Customer Service _ Failed Rebill
- Customer Service _ CC Expires in 14 Days
We’ll use these inside of ThriveCart in a minute.
Step Seven: Connect Customer Behavior Tags in ThriveCart
Go back into the product by selecting ‘edit’ – then go to the tab labeled ‘Behavior’
You’re going to create 4 different ‘rules using the tags created in the previous step:
- When the main product is purchased, use your email marketing platform to add the tag ‘[NAME OF MEMBERSHIP] _ Active Member’
- When a subscription is cancelled, use your email marketing platform to add the tag ‘[NAME OF MEMBERSHIP] _ Cancelled’
- When a recurring payment fails, use your email marketing platform to add the tag ‘Customer Service _ Failed Rebill’
- When the credit card is due to expire, select 14 days + use your email marketing platform to add the tag ‘Customer Service _ CC Expires in 14 Days’
Here you’ll notice there’s a lot of other ways you can customize your buyer’s experiences. Have fun playing with all the different options! These are the ones I’ve found to be the most helpful.
Now, save the product to get the URL.
Step Eight: Add the Checkout URL to your Sales Page
And last but not least, connect your checkout page to your sales page to complete setting up your membership in ThriveCart.
Have any questions? Feel free to email me at alex@anomadicentrepreneur.com and I’ll see what I can do!


